Posts

Review of the Daisy Mae Designs Papercraft Society Box

Image
Hello friends, sorry that it has been a little while. I've had a busy few months but I finally completed a big personal goal. To celebrate I treated myself to a Papercraft Society box from Craftstash and thought I would share what I thought of it! The Papercraft Society runs as a subscription service, but also offers the option of one off purchases for a limited number of surplus boxes. This is the method I chose, I was so enamoured by the Daisy Mae box that I had to have it! And boy was I glad I bought it!  The box came with a gorgeous stamp set, hand drawn by Clare Rowlands in her beautiful whimsical style. There are also matching dies for the majority of the stamps, for those that don't enjoy fussy cutting. You get a selection of card stock, including water colour card to use with the watercolour pencils included. There are also matching patterned papers, pre-die cut sentiments, some adorable heart shaped wooden buttons, rustic brown twine, a large amount of jute/hessian rib

Rolled Watercolour Flowers Tutorial

Image
Hello, today I wanted to write a bit of a tutorial on the rolled watercolour flowers I have been making, as I got a few requests on how they were made. Quite simple and a nice way to brighten up your card! To make them you will need some thin watercolour card, a rolled rose die, I used one from a magazine and one from a craft work cards wreath set, purchased from craftstash. Then you will need something to colour them with, I used watercolours and a paintbrush. Then a pair of tweezer to roll and shape them. Cut the flowers using your dies, I could do two at a time with my watercolour card. Then I added the colour as is shown below. Allow them to dry until they are just slightly damp. It isn't completely necessary to do this step, but I used my flower shaping tool and a foam mat to curl each of the petals upwards, by pressing down on each petal on the back of the coloured side. Then use your tweezers to curl the flowers, starting from the outside of the die c

Opulent anniversary card!

Image
Hello! Today I am sharing this anniversary card in a colour scheme that I'm really enjoying at the moment. I'm starting to feel a bit better so enjoyed spending a bit more time creating this card. Now it's complete, I think it would be good for a Sapphire Anniversary.  I made the royal blue flowers first, as I had to heat emboss, fussy cut, shape and assemble with the glitter and center so they took the longest. I love making the flowers, it's amazing how you can turn flat card into something beautiful. I used gorgeous pearlescent Papermill Direct card for the flowers and cream heart. I used Daisy Mae Designs heart dies and heat embossed the Altenew watercolour florals stamp around the edge for some subtle detail.  The leaves were die cut from a Tim Holz funky florals set and backed with tracing paper. I added a little Wink of Stella for a bit of sparkle when they catch the light.  The cream rose is from my stash, so beautiful with it

Pretty in Pink Baby Card

Image
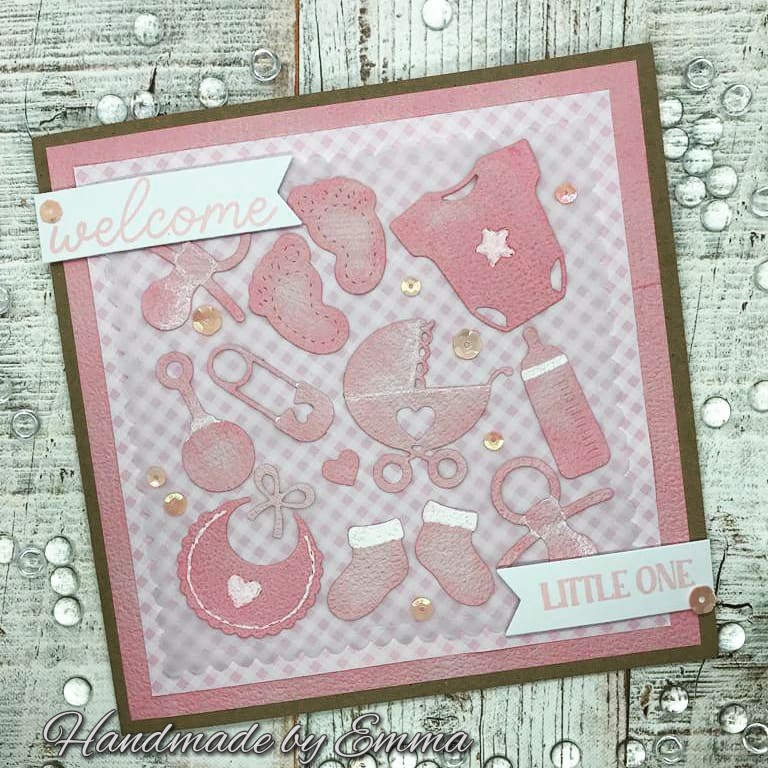
Hi all, hope you are all doing well. Today I am sharing this baby card I made for my stash over the weekend. I still haven't felt well enough for any long periods of crafting so I've mainly been backing my magnetic sheets onto strong card stock so I can access my dies more easily. In doing so I found a few dies, including the baby ones used here, that I hadn't got round to using yet. So I decided I would make a baby card to have in my stash. I already have a blue one so went for a 'girlier' pink.  I cut the dies out of an old pink wallpaper sample and coloured them with distress oxides and my white gel pen to give them some dimensions. I then arranged them onto the scalloped tracing paper square so that they were roughly evenly spaced.  I then layered them onto a piece of gingham pink paper and another bit of the wallpaper sample.  A few tonic tutu sequins and a sentiment stamped from a craft work cards set and the card was done. I had

Opulent birthday pop-up box card.

Image
Hi, I hope you are all doing well. Today I am sharing this card I made a couple of weekends ago. I haven't been feeling so well recently so have only been able to do little bits of crafting here and there. However I really love the colour scheme I used for this pop up box card and I am working towards making an anniversary card in similar tones. This card was in part inspired by the paper pad I used. An opulent forever friends one by Papermania. Such beautiful foiled papers and I wanted to use one of my new Sizzix die sets to make the little party items to go in the box. I started by making the box shape, using my scoring tool and I used a die from the works to add the scalloped edges. I then added a little gold ink to these to make them stand out. I then matted and layered the gold and spotty papers onto each of the 8 panels. This in itself took quite awhile but it was worth making sure I had all the layers relatively even.  I then added the bars in

Simply Cards and Papercraft Feature!

Image
Hello, I have shared this news on my instagram and craftworld pages, but I wanted to document it on my blog too. I was lucky enough to win a page feature in Simply Cards and Papercraft issue 205 through a competition on craft world! Below is a sneaky peak of my feature, I've taken a picture of the card itself next to it! For the competition I had to make a fathers day card and I decided to make a clockwork themed card inspired by the design you see through some watches. I cut the letters out and put the cogs behind it. You can read more in the magazine about what I used to make the card! The magazine itself comes with a lovely tropical themed stamp set with co-coordinating dies and embossing folder. I've included pictures below of two cards that I have made with it so far! All using watercolour backgrounds made using the packaging technique. I stamped all the images using black memento ink and coloured using my promarkers. The

Teal and Pink Anniversary Card

Image
Hello and happy Wednesday. Today I am sharing an anniversary card. I like to have a few of each card theme in stock in case one is needed at the last minute. Here is one that is quite fancy and frilly but it has lots of little details if you look closely. To begin I actually made all the flowers. The pink ones are made from pearlised card. I cut two layers of a flower die for each one. To give them their shape I wet each layer and shaped each petal by gentle scrunching it around a pen to give it a curved shaped. Once dry I added a little distress oxide to the edges of each petal and then glued them together. The smaller foam flowers were cut out of a different die, inked on the edges again and then heated on an iron to make them curl. I added a few stamens then glued them together again. I then die cut all the card layers and inked some of the edges again in the same worn lipstick distress oxide. I did some partial stamping across the two white layers using an Alten